
What websites are driving traffic to your community?
How well did your new Google Adwords campaign perform last quarter?
Is your social media marketing strategy driving quality leads and leases?
If you’re not set up with the right analytics tools, these can be difficult questions to answer.
By now, you’re probably using some form, or combination of, marketing analytics tools to measure how your marketing efforts are performing. But, with today’s technology advancing faster than ever before and competition being at an all-time high, new (“and improved!”) analytics tools are hitting the market every day, making it hard to know which ones you should be using.
Before you can determine what your technology stack is missing, you need to lay a strong foundation and start with the essentials. To help, we’ve boiled it down to the three core analytics tools that will give you all the insight and data points you’ll need to run highly effective, data-driven digital marketing campaigns. From there, the sky's the limit.
Let’s get started!

Step one for setting up a strong analytics foundation? Google Analytics.
Google Analytics may be an industry standard, but it’s far from "basic." GA is essential for analyzing your website's traffic, assessing how visitors are using your website, and optimizing those efforts to get the results you want.
We know it can seem daunting to familiarize yourself with such a robust tool, but trust us, you'll get a better picture of your site and users after proper implement of Analytics.
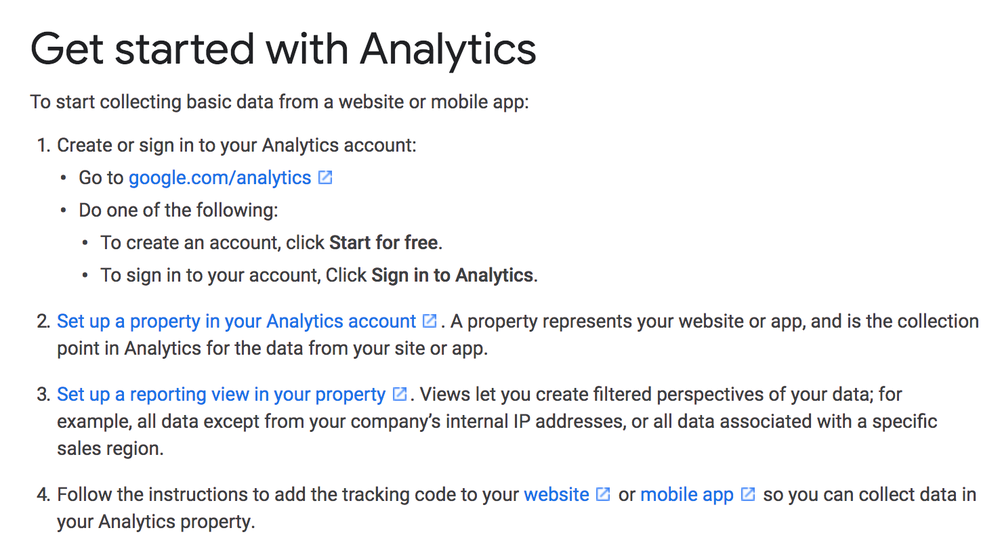
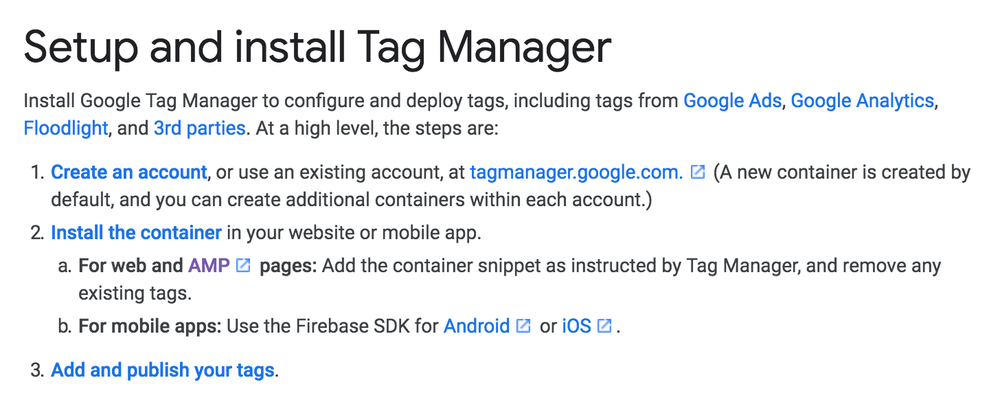
Straight from Google, here is a step-by-step layout for getting your Google Analytics account set up:
You may be tempted to skip step #3.
Do yourself a favor; don’t.
Doing this is important because — without a reporting view — your data will be unreliable.
If you create your Google Analytics account without a reporting view, you’ll be gathering data on all activity on your site. That includes activity generated by your employees and web crawlers, which is irrelevant to your goals and results.
Therefore, setting up a reporting view helps filter out this unwanted activity from your data.
Not to mention, you could take it a step further and create additional views to segment your audience into targeted groups.
Once your Analytics account is set up, the next vital step is setting up goals.
You can set up a goal for just about any action (or combination of actions) that your web visitors take. We’ll start with the goal types, as laid out by Google:
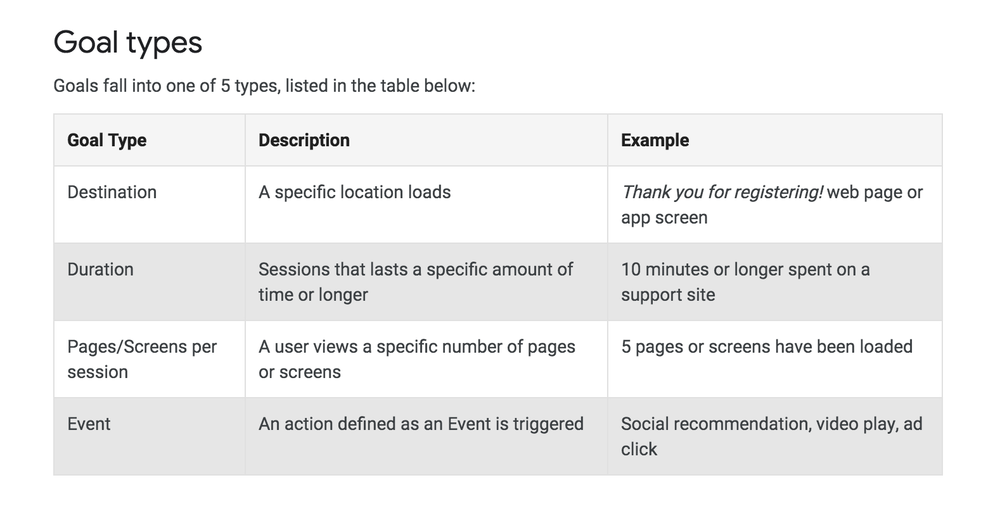 You may notice that the text above the chart says there are 5 types of goals. The 5th type is Smart Goals.
All but the Event goal type are fairly self-explanatory, so here’s a quick overview of event goals.
Event Goals give you limitless possibilities in terms of defining a certain user behavior that you want to track. You can create an event that triggers a goal completion when someone clicks (or otherwise interacts with) specific content.
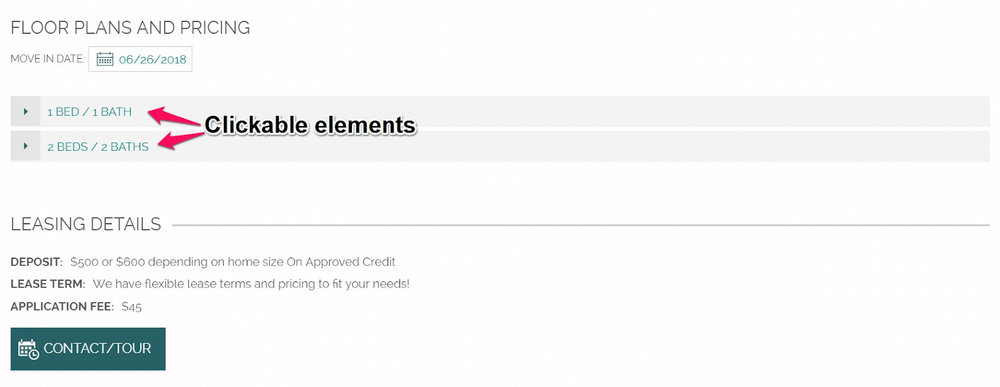
For example, let’s say you want to know which types of floor plans your website visitors are most interested in.
You could use a destination goal that fires whenever someone arrives on a particular floor plan’s URL. But what if you don’t have a separate page for each one of your floor plans?
What if your pages are set up so floor plans are all on one page in various collapsed menus?
This is the case in the image below:
 Event goals give you the key capability to track any user behavior you want.
Notice that when a user clicks on “1 Bed / 1 Bath,” you end up with an expanded view, as shown in the image below:
 With Google Tag Manager set up, you could track clicks on any number of different floor plans and see that data in Google Analytics.
The problem is, the URL doesn’t change when the user clicks to expand their view. And since a destination goal would only fire when someone lands on a new URL, you won’t be able to track these clicks without an event goal.
In other words, you won’t know which floor plans your website visitors are most interested in.
This is essentially what makes event goals so important. However, you’re going to need Google Tag Manager (GTM) to set these up.
We’ll expand on Google Tag Manager later. But for now, it’s important to understand what event goals mean for your reporting capabilities.
You can create a report for any set of data you have in Google Analytics, whether it’s a simple audience overview or a more complex progress report on conversions.
Whatever metrics you’re looking at, just click on the share button (shown in red below) and you can send a recurring report to anyone you want.
 Event goals give you the key capability to track any user behavior you want.
Set the frequency however you like and choose the day that everyone should receive the report.
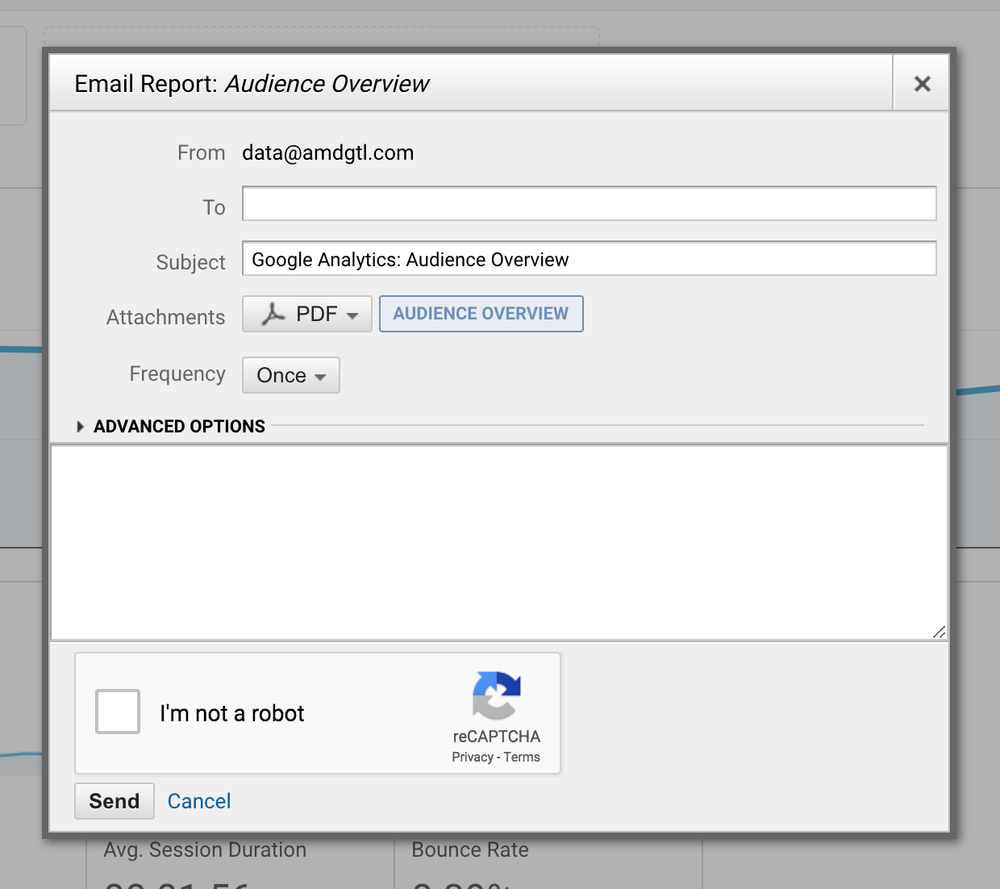 Select the frequency and day of week that coincides with marketing meetings and review the findings at regular intervals.
There’s far more to explore in Google Analytics. So much so that it can quickly get overwhelming. Here are a few places to start:
1. Channels
From the left sidebar of your Google Analytics dashboard, go to Acquisition > All Traffic > Channels. Here, you can see how people are arriving to your site. This report is divided into Direct, Referral, Organic Search, Social, and Other.
Click on Referral and you can drill down further to see which domains are sending the most traffic. If you’ve got goals set up, you can see the rate at which the traffic from one domain is converting compared to traffic from another domain.
If traffic from a certain domain is converting really well, you might consider allocating more budget to that channel.
2. Audience Overview
From the sidebar, go to Audience > Overview. Then under demographics, click on “City.” To the right, you’ll be able to see which cities your website visitors are from. This can be really useful for apartment marketers who need more information about prospective renters relocating from other cities.
3. Landing Pages
Go to Behavior > Site Content > Landing Pages. From here, you can analyze the performance of your landing pages. Again, if you have conversion goals set, you can see how your landing pages are performing based on these goals. Or, you can choose to analyze them based on bounce rate before you even set up goals.
By default, Google Analytics tracks information about who your users are, where they’re coming from, what devices they’re using, and what pages they’re visiting. But it needs help.
Specifically, in the form of what are called “tags.”
Tags are snippets of code that are placed onto your site to analyze and report on various user behaviors.
The biggest benefit of using a tool like GTM is that gives you one place from which to manage other 3rd party tags, like your the Facebook Pixel (more on that later).
When you start to accumulate lots of tags (and you will), Google Tag Manager helps you keep them organized.
And that’s not only convenient for you, but it also makes your site much faster.
With tracking ID in hand, the setup and installation process (at a high-level) goes like this:
 If you’re working with multiple websites, make sure to give each website its own container in GTM
Now that you have GTM setup, remember that Google Analytics code we just installed? We want to add that to GTM so we can take advantage of the full list of benefits and advantages we can with this combination.
If you’re following along, you already have Google Analytics set up so you’ll want to remove the Google Analytics tag from your website. Otherwise, you run the risk of having duplicate data tracking from 2 different places (ie - on your website AND in GTM).
Once you’ve removed the GA code from your website, we want to add it to GTM. To do this, you’ll need to find your Google Analytics tracking ID, which you can find by going to Admin > Property Settings in your Google Analytics dashboard.
Now we can add back your Google Analytics tag, but instead of placing it directly into your website’s code, now you can use GTM.
To do this, click on “Tags” in the sidebar of your GTM dashboard and create a new tag with the parameters shown in the image below:
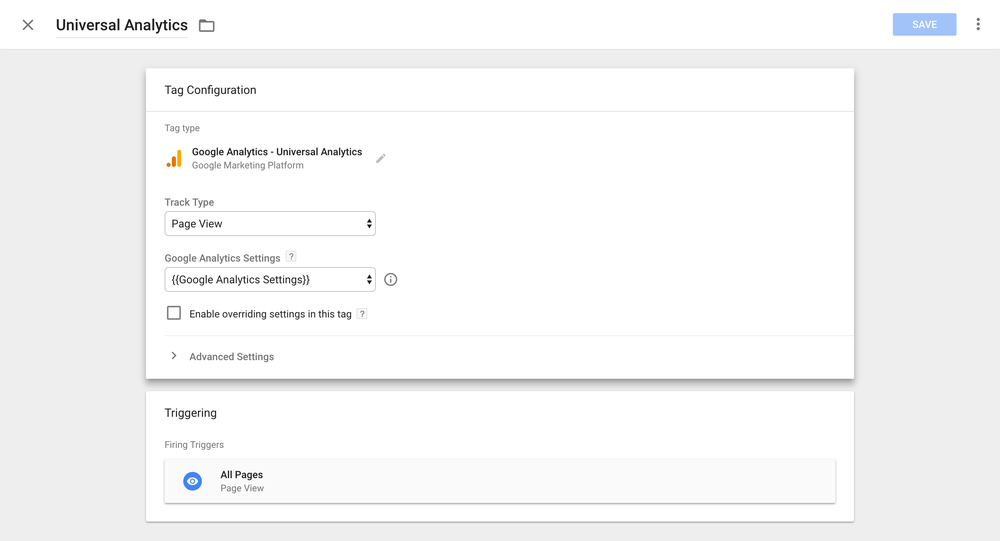 Click the checkbox under "Google Analytics Settings". The blurred out part in this image is where you Google Analytics tracking ID will go.
To create other tags, you’re going to need to configure built-in variables and create triggers.
Variables are essentially data placeholders that get populated based on what your users do. Triggers, as the name implies, consist of a set of conditions that must be completed for your tag to fire.
Once you have a tag set up, containing a trigger and a variable, you can see the data it’s pulling in your Google Analytics dashboard under “Events.”
For more technical guidance on setting up and implementing tags, check out this post.
Here’s an example of a tag that fires whenever a user clicks on the primary CTA on the homepage of a sample website we created.
To see the your data, head over to your GA dashboard, then navigate to Behavior > Events > Top Events.
Once you’ve done that, you’ll get something that looks like this:
 Yellow is Event Category, blue is Action type, and red is the Event Label.
From here, you can analyze these conversions based on where the user came from, the time of day, the user’s geographic location, the device they were using, and much more.
Note that categories, actions, and labels allow you to establish your own naming conventions so the reports you can pull from Google Analytics are useful to you and your team.
What makes GTM so powerful is its flexibility. But that’s also what makes it difficult to tell you exactly how to maximize Google Tag Manager.
The tags you want to set up will depend entirely on what you want to track.
Of course, there are a few things, such as form submissions, abandoned forms, clicks, etc. that everyone should be tracking.
Regardless of what you’re tracking, it’s important to map out and organize everything you want to track, especially if you have a large website with a lot of CTA’s, links, buttons, etc.
Why?
Two words; naming conventions.
Ensuring that you have clear methods (or even formula’s) for how you identify each trackable item in GTM doesn’t only make it easier to setup - it makes it easier to read your reports and quickly identify what you’re data is telling you.
If you haven’t already, make sure to read over Google’s Event-implementation best practices if this is your first time setting up GTM.
In 2017, Facebook accounted for more than one in five US digital ad dollars.
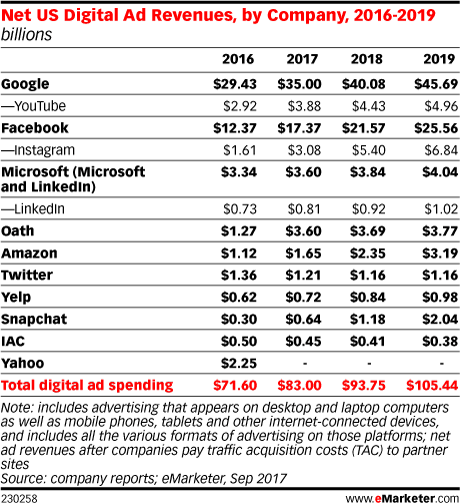
Part of the reason for Facebook’s dominance is the Facebook Pixel.
Brands today are eager to add their own Facebook Pixel to their website(s) for loads of reasons. It will help you run more targeted ad campaigns, track and analyze how effective your Facebook ad campaigns are performing, even help you understand what people are doing on your website, and a whole lot more.
For more advanced campaigns, you can even setup events (the same kind of events you create in Google Tag Manager), to give you even better insight into user behavior.
So what are we waiting for? Let’s get you setup!
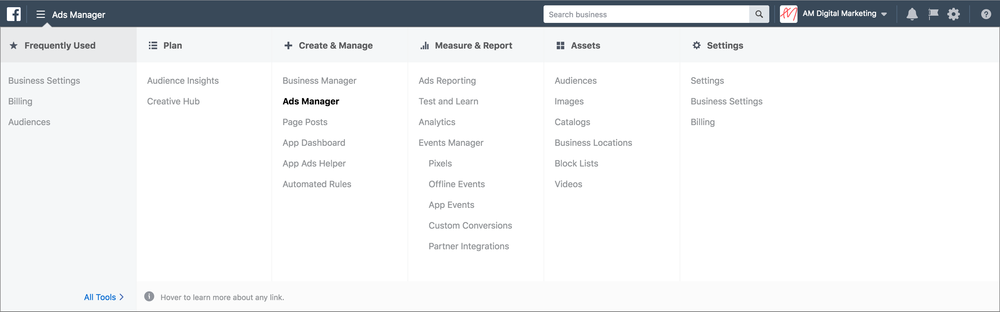
Go to your Ad Manager in Facebook and select “Pixels” from the drop-down under Measure & Report > Events Manager > Pixels .
Here you’ll be able to grab the code for your Pixel that you’ll use to create a Custom HTML tag on GTM. (Here’s Facebook’s guide on how to do this.)
From there, you can now start creating all sorts of custom conversion events based on what you want to track.
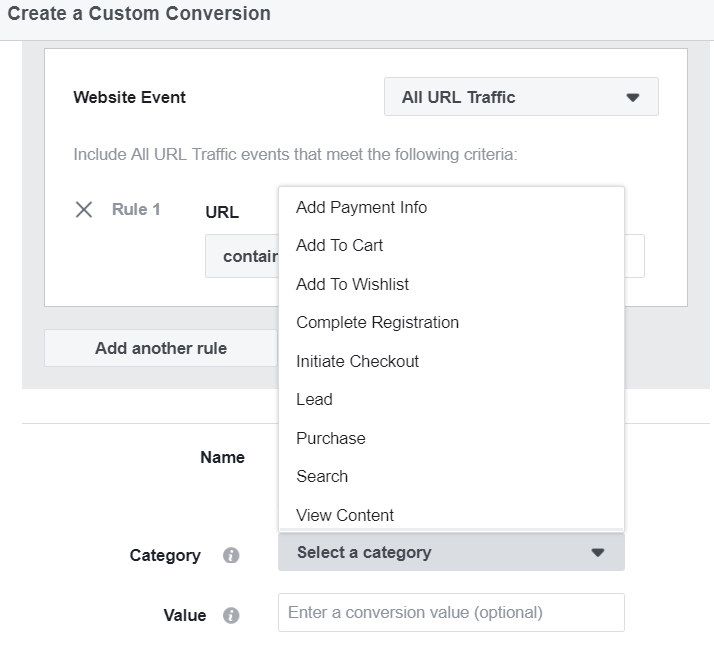 Facebook provides default categories for various conversions. Apartment marketers should start with leads.
As Instapage points out, the Facebook Pixel is “One of the most powerful retargeting tools on the internet.” So it (literally) pays to know about and leverage the Pixel’s powerful retargeting features.
One of our favorite features is the Lookalike Audience.
![]()
The best way to show the power of Lookalike Audiences is with an example.
Let’s say you launch a Facebook Ad campaign targeting a certain buyer persona.
The ad leads to a landing page where users can schedule a tour of your community. From there, they’ll either schedule a tour or leave the landing page.
All the while, the Pixel (configured with custom conversions) will track both groups of users: the people who convert and the people who don’t.
Once enough of these conversions happen (or don’t), you’ll have a database of users which Facebook can use to create a Lookalike Audience of similar users.
This way, you can retarget people who abandoned your landing page and also target users similar to the ones that converted.
In other words, you get a larger reach and increasingly well-targeted ads.
 You'll need the Facebook Pixel installed on your site to effectively leverage Lookalike Audiences.
When you’re first starting, you’ll want to create conversions for and track form submissions, abandoned forms, and relevant clicks.
As you get more familiar with the tool, you’ll find all sorts of things that will be useful to track based on your unique business goals.
The legendary Peter Drucker may have said it best, “if you can't measure it, you can't improve it.”
Deep stuff, right?!
Not to mention, tracking user data and analytics is typically the only way for us to know what people are doing online, making Drucker’s insight truer today than it’s ever been before.
So save yourself the stress and guesswork, and get familiar with these 3 essential tools, and you’ll be well on your way towards making data-informed decisions on your marketing campaigns.